 Lemon wiki
Mixer
Every sound ends up in the mixer. It has a Master track, then Bus 1, Bus 2 and so on, each showing your own name once you give it one. Press F9 to show or hide it.
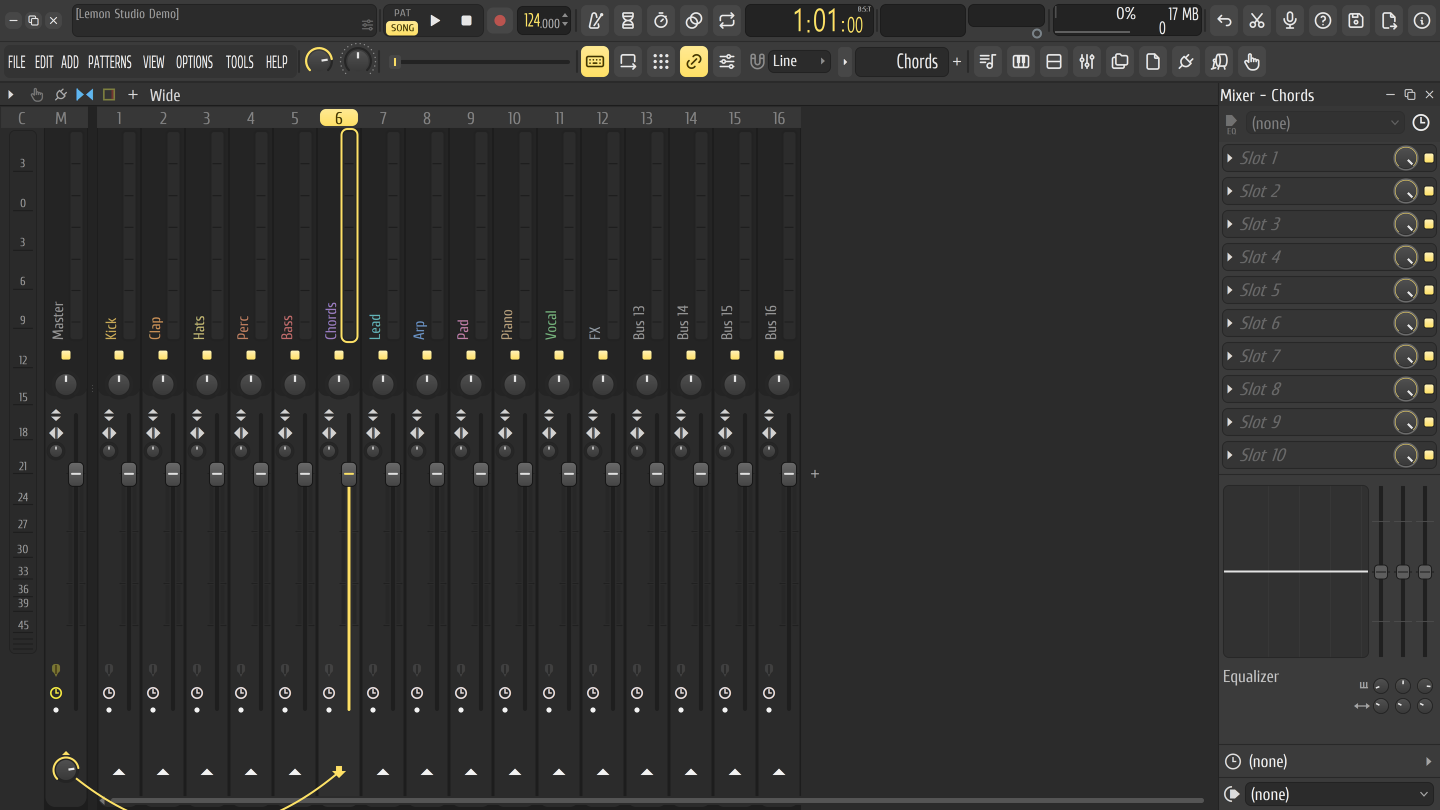
The strips are on the left. The panel on the right shows the selected track: its effect slots, its equalizer and its audio input and output.
Give an instrument its own track
Section titled “Give an instrument its own track”- In the instrument rack, find the instrument’s small number box.
- Drag it up or down to pick a track, or press Ctrl+L with the instrument selected to route it to a free track.
- Double-click the box to see that track in the mixer.
The + after the last strip adds a track, and the + in the title bar adds one after the selected track.
On each strip
Section titled “On each strip”- The small switch mutes the track. Right-click it to solo.
- The knob under it is pan, and the fader is volume.
- The two small buttons reverse polarity and swap left and right, and the little knob sets stereo separation.
- Right-click a knob or fader for its menu: Reset, Enter value…, Create automation clip, MIDI learn… and more.
- Right-click the strip for the track’s menu. F2 renames it, or Shift+click its strip. Ctrl+click selects several tracks, and a drag on one selected fader moves them all.
Sends and routing
Section titled “Sends and routing”New tracks go to the Master. To send a track somewhere else:
- Select the track.
- Look at the small arrows along the bottom of the other strips. Click one to route the selected track there. A knob appears for the send level, and a cable shows the route.
- Ctrl+click the arrow to route only there. That takes it off the Master, which is how you make a bus for drums or vocals.
Right-click an arrow for the same choices in a menu. Click the small mark above a send knob to remove the route. Routes that would make a loop are refused.
Effect slots
Section titled “Effect slots”Each track has ten slots.
- Add an effect: click an empty slot to open the plugin palette, or drag an effect onto it from the browser. F8 puts your pick in the selected track’s first empty slot.
- Open it: click the slot’s name.
- Blend or bypass it: use the slot’s mix knob and its small switch. Right-clicking the switch solos the slot.
- Move it: turn the wheel over its name.
- More: the arrow at the slot’s left opens its menu: Replace, Delete…, presets, A/B compare and Wrap in container, which puts effects into a Lemon Container.
The track EQ
Section titled “The track EQ”The Equalizer at the bottom of the right panel is built into every track, with no slot needed. It has three bands: low shelf, peaking and high shelf. Drag a band on the graph, or use its gain fader and its frequency and width knobs. For more bands, use Lemon Parametric EQ.
Sidechains
Section titled “Sidechains”To make an effect listen to another track, such as a limiter ducking to the kick:
- Select the track you want it to hear.
- Shift+click the arrow on the track that holds the effect. This routes the sound there at zero level, so it isn’t heard twice.
- For a CLAP or VST3 effect, open the slot’s menu on the effect’s track and choose the track under Sidechain input. Lemon Limiter has a sidechain number box in its own window instead.
Delay compensation
Section titled “Delay compensation”Some plugins delay the sound while they work. Lemon Studio makes up for the delay they report on every other path through the mixer, in playback and in exports, so everything stays in time. There’s nothing to set up.
- Mixer options ▸ Plugin delay compensation ▸ Automatic turns it off.
- The small clock on a strip sets that track’s own latency, and the clock beside the audio input sets the input’s. Right-click either one to reset it or to type a value.
Compensate for master latency and a few other latency options are greyed out: they aren’t available yet.
Good to know
Section titled “Good to know”- The arrow at the top left of the mixer opens Mixer options. View ▸ Waveforms (Alt+W) swaps the meters for scrolling waveforms, and Detached moves the mixer to its own window, for a second screen.
- In the track menu, Create group… marks out a set of tracks, Dock to keeps a strip in view while the others scroll, and Trim unused tracks in Mixer options deletes tracks nothing uses.
- File ▸ Render to wave file… in the track menu writes the selected tracks to audio files, and Save mixer track state keeps a track’s settings to use again.
- Only the Wide layout is available so far, and Multi-touch control and the Track inspector are greyed out.
Related
Section titled “Related”- Your plugins
- Instruments and effects
- Automation
- Recording: record into mixer tracks