 Lemon wiki
Pulp Filter
Pulp Filter is a row of up to eight filters that you can make move. Each filter’s cutoff, resonance, volume, pan and more can be driven by a drawn pattern, an LFO, an X/Y pad or an envelope follower that listens to the sound itself. Use it for rhythmic filter sweeps, gated chops, slow movement on pads, and sounds that react to what’s playing.
It’s built into Lemon Studio, and also comes as a VST3 and CLAP plugin for other DAWs.
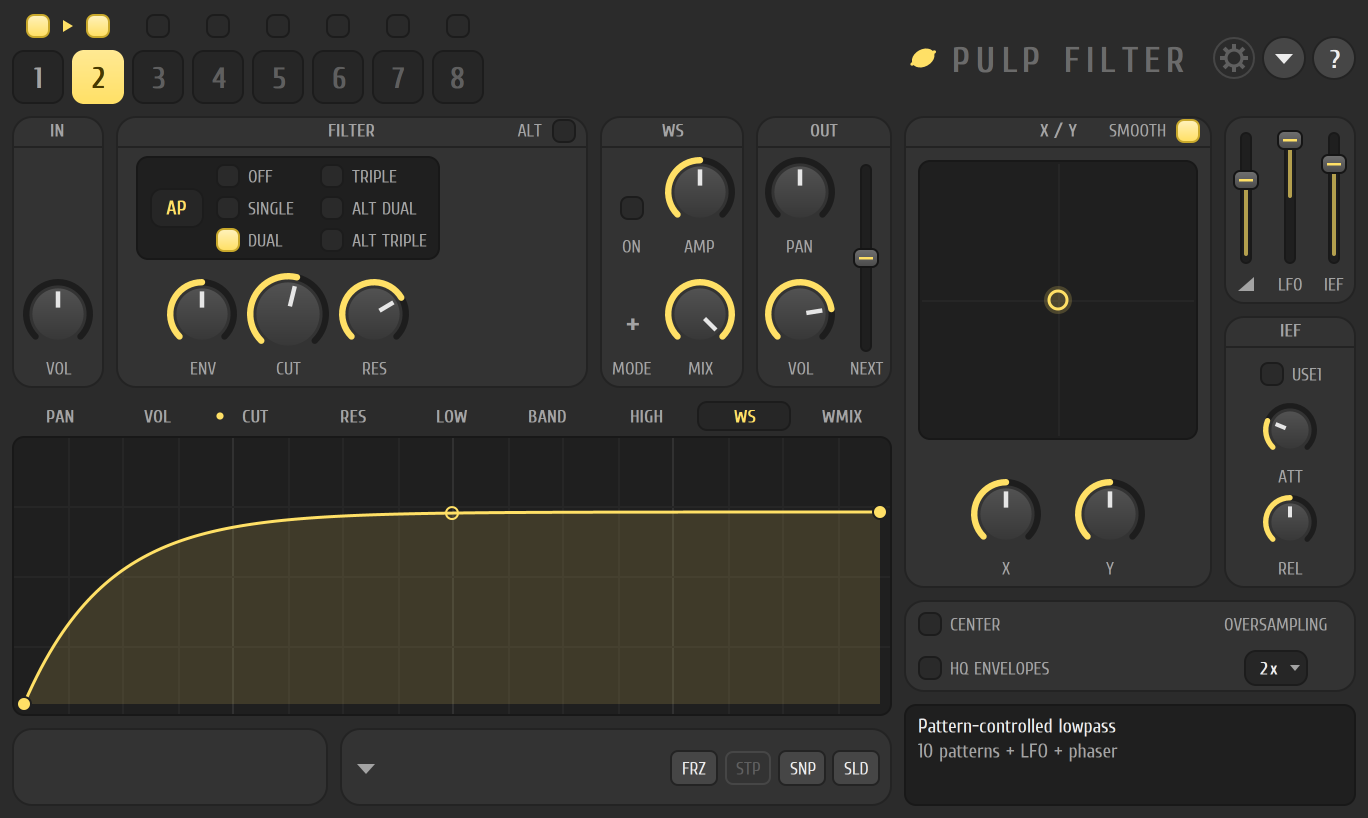
Make a filter follow a pattern
Section titled “Make a filter follow a pattern”- Put Pulp Filter in an effect slot on a mixer track. Make sure filter 1’s switch, above its numbered tab, is lit.
- In the FILTER panel, click the type box (it opens a list of filter types) and pick LP for a low pass. Turn CUT and RES to taste.
- Under the panels, click the CUT target tab, then the PAT tab, and switch ON in the bar below the curve.
- Right-click in the curve to add points, and drag them to draw the movement. Drag the small circle between two points to bend the line.
- Switch TEMPO on in the same bar, so the pattern runs in time with the project.
The window
Section titled “The window”- Filter row. Eight numbered tabs, each with a switch above it. Click a tab to edit that filter, and right-click a switch to solo it. When a filter’s NEXT slider is raised, an arrow shows that it feeds the following filter.
- IN, FILTER, WS and OUT panels. IN is the input level. FILTER holds the type box, an ALT switch, an order list (from OFF and SINGLE up to ALT TRIPLE) and the ENV, CUT and RES knobs. Some types add controls, such as three level sliders or a GAIN knob. WS is a waveshaper with ON, AMP, MODE and MIX. OUT has PAN, VOL and the NEXT slider.
- Target tabs. PAN, VOL, CUT, RES, LOW, BAND, HIGH, WS and WMIX: pick which setting you’re shaping. A dot on a tab means something is controlling it. The WS tab shows the waveshaper’s own curve.
- Part tabs. For the target you picked: PAT (a pattern, with a pattern number from 1 to 10 at the left), LFO, MOD A and MOD B (they map the pad’s X and Y to this target), and IEF (the envelope follower).
- Curve editor. Drag points, drag the circles between them to bend the segments, and right-click for each point’s menu or to add one. The buttons under it hold FRZ (hide points and freeze editing), SNP (snap to the grid) and SLD (slide the points after the one you move). STP is greyed out.
- X / Y. A pad whose dot you drag, with X and Y knobs, and a SMOOTH switch.
- Levels. Three sliders for the master level, the LFO level and the envelope follower level.
- IEF. The envelope follower’s ATT and REL knobs, and USE1 to make it listen to filter 1.
- CENTER, HQ ENVELOPES and OVERSAMPLING. CENTER removes any constant offset, HQ ENVELOPES smooths the envelopes, and OVERSAMPLING runs from 1x to 16x.
The round buttons at the top right open options and an info page. The gear button (show or hide the left controls) is greyed out.
- A low-pass filter with its VOL target patterned into on and off steps gives a gated, rhythmic chop.
- Try the IEF tab on CUT so the filter opens when the sound gets louder.
- Pick a pattern number to keep a few different rhythms and switch between them.
Related
Section titled “Related”- Mixer
- Automation
- Lemon Filter, for a simpler resonant filter
- Lemon Peak Controller
- Plugins